When it comes to squeezing a large vehicle into a small garage, options like lasers, mats, and blocks are commonly used to assist drivers in parking their vehicles. These traditional methods work just fine, but they have limitations in terms of accuracy and effectiveness. Beyond that, they're generally designed to help you park your vehicle as far into your garage as possible, which just wouldn't work in my scenario. Like many homeowners, I use my garage for far more than just parking my vehicles, so I wanted a way to keep them parked as close to the front of the garage as possible, obviously without the garage door closing on them.
In this installment of our "Off Topic" blog series, I'll show you how I created a custom, albeit extremely over-engineered parking aid using an LED strip and an IR sensor. Because while a tennis ball might work, it's not that cool! To control the LED strip, we'll be using WLED just like our previous "Off Topic" series post.
The hardware used in this project is as follows:
- ESP32: We'll need a small microcontroller to run WLED and control the electronics. I typically use an ESP32 for projects like this, but it's simple enough you could use an ESP8266 as well.
- LED strip: There are many, many options available. I used a spare strip of WS2812B LEDs I had laying around.
- Aluminum LED channel and diffuser: You can make things look clean with a simple LED channel and diffuser, which also makes mounting the LEDs easier.
- IR proximity switch: This is to detect your vehicle's position. Again, lots of options here, but I wanted something that didn't require running wires to both sides of the garage door, so I used a "diffuse reflection" type photoelectric proximity switch which only required a small reflector at the opposite side of the door.
- Power supply: For simplicity’s sake, I used a 12-volt PSU since the IR switch required 10-30 volts.
- DC power extension: Unless you have an outlet within a few feet of your garage door, you'll probably need an extension cable.
- Voltage converter: My LEDs and ESP32 require 5 volts, so I'll be using a buck converter to convert the incoming 12 volts from the aforementioned PSU.
- Project box: Finally, you'll want something to hold all the electrical components instead of letting them dangle by their wires, exposed to dust, bugs, and curious humans or animals.
Here's basic overview of how all these components work together:
- The PSU powers the IR sensor directly, as well as the LEDs and ESP32 via the buck converter.
- The IR sensor is mounted on one side of the garage door and its reflector is mounted on the other side. The IR sensor essentially emits a beam of IR light, and senses that beam being reflected back at it.
- When an object passes through the beam, the switch is triggered. That IR sensor is wired to a GPIO pin on the ESP32 to act like a button so one WLED preset triggers when the sensor is obstructed, and another preset triggers when the sensor is no longer obstructed.
- For the second preset, we'll be using WLED's "nightlight mode" so the LEDs turn off after one minute.
And now, onto making it all work! We'll assume you've already got WLED installed on the controller of your choice and ready to configure. Let's get started:
- Find the forward-most point of your vehicle and measure the distance off the ground. You'll want to choose a point where a variance of a couple inches up or down won't be completely out of the sensor's beam.
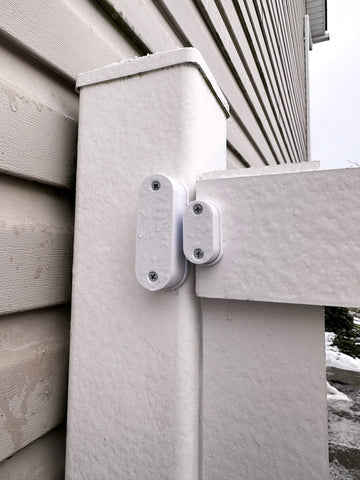
- Mount the IR sensor to the side of your garage door roughly the same height of the point you measured in the last step. I designed and 3D-printed some custom brackets which screw into the frame next to my garage door's rails and hold the sensor off the wall far enough so when the vehicle clears the sensor, it will be a few inches clear of the garage door. This is the important part; you'll want the sensor placed far enough into the garage so that when it's no longer obstructed, the front of your vehicle is well clear of your garage door. We will mount the reflector later.
- Wire the sensor up. The sensor I've linked above is the one I used. This sensor uses a brown wire for positive, a blue wire for negative, and a black wire for the switch signal. Wire this into your PSU as necessary, and connect the black wire to an unused GPIO pin on your microcontroller. I used GPIO5 on my ESP32.
- Connect the LED strip, the green data wire typically goes to GPIO4 on the ESP32. Then wire the power leads however applicable based on your PSU or voltage converter.
- Wire your ESP32 up. VCC pin to your PSU or voltage converter's positive and GND pin to the negative. The signal wire from the IR sensor as well as the data wire from the LED strips should be connected already.
- Once everything is wired up, it can be powered up! Once WLED is booted and your LED strip is working, we can mount the IR sensor's reflector. There's typically an adjustment screw on the back of the sensor body which adjusts the sensing distance, it might need adjusted. However you're mounting the reflector, have it prepared and put it in place on the opposide side of the garage door and move the reflector up and down to find the "sweet spot" where the sensor's LED indicator next to the adjustment screw stays off, thus indicating a clear beam path. Once you find the right spot, go ahead and mount the reflector.
Now that everything is working, all we need to do is set up the WLED presets and triggers:
- Load up your WLED instance's web interface, go to Settings > LED Preferences and scroll down to the "buttons" section. Set the PIN you wired the IR sensor's signal wire to, again, I used GPIO5:

- Go to Settings > Time & Macros and scroll down to the "Button actions" section. Enter a "1" in the "short" column for your button, and a "2" in the "long" column (these are going to be the corresponding preset IDs):

- Finally, create a preset with an ID of "1" and set it up to display what you want when the sensor is clear, then do the same with another preset with an ID of "2" which will display when the sensor is obstructed. To enable nightlight mode so the "cleared" preset turns off after a minute, you'll need to edit the preset's JSON API command to add "nl":{"on":true,"dur":1,"mode":0,"tbri":0}. As previously mentioned, this post doesn't get into the nuts and bolts of configuring WLED, but you can access the WLED knowledge base here for more information.
Now you can test the sensor out and make sure your desired presets are triggering correctly! I used the "Chase 2" effect with a reversed segment to trigger when the sensor is obstructed:
And when the sensor is clear again, the whole thing turns green, and of course turns off completely after one minute:
So in the end, a simple tennis ball on a string would have certainly been quicker and easier, but this was a fun project I could tackle using mostly spare parts I already had. Plus, it's way cooler!
I've even taken this concept a step further, and now I have the LED strips in the garage turn red when our Roborock vacuum is running, as it's already been ran over once before because my wife didn't realize it was under her car when she was leaving. Now we'll always know when the robot has ventured from the safety of its dock:


 button, then choose either the Choose Directory to Add or Choose File(s) to Add button depending on how many files you have. Browse to your file(s) or directory, select them, and click the Open button, followed by the OK button to finish importing them.
 button. Browse to the folder with your image files, and click the Import button. You should see a notification at the bottom of the window that your information was imported:
 next to each one to see which looks best. I am not a radiologist or a doctor so I'm not really sure what the difference was between all my scans, but I chose the one which looked best and most clear from all three axis.